
If your computer suddenly won’t start after the January 2026 Windows update, you’re not alone, and more importantly, it’s not your fault. We’ve had dozens of Tyler residents call TechEase with the same problem: a computer that was working perfectly fine one day, and the next morning it’s stuck on a black screen or showing a blue error message.
What’s even more frustrating is that many people tried the usual fix of rolling back the update, only to find their computer in worse shape than before. If that’s happened to you, don’t worry. You didn’t do anything wrong. The problem runs much deeper than a simple “bad update.”
Today, I’m going to walk you through exactly what happened, why the usual fixes didn’t work, and, most importantly, how to get your computer back up and running. We’ll take it step by step, at your pace, with no technical jargon or judgment.
🔍 What Exactly Broke: The “December Ghost” That Haunted January
Here’s the story in plain English: this problem actually started back in December 2025, even if you didn’t notice it at the time.
The December Setup: When “Fixed” Wasn’t Really Fixed
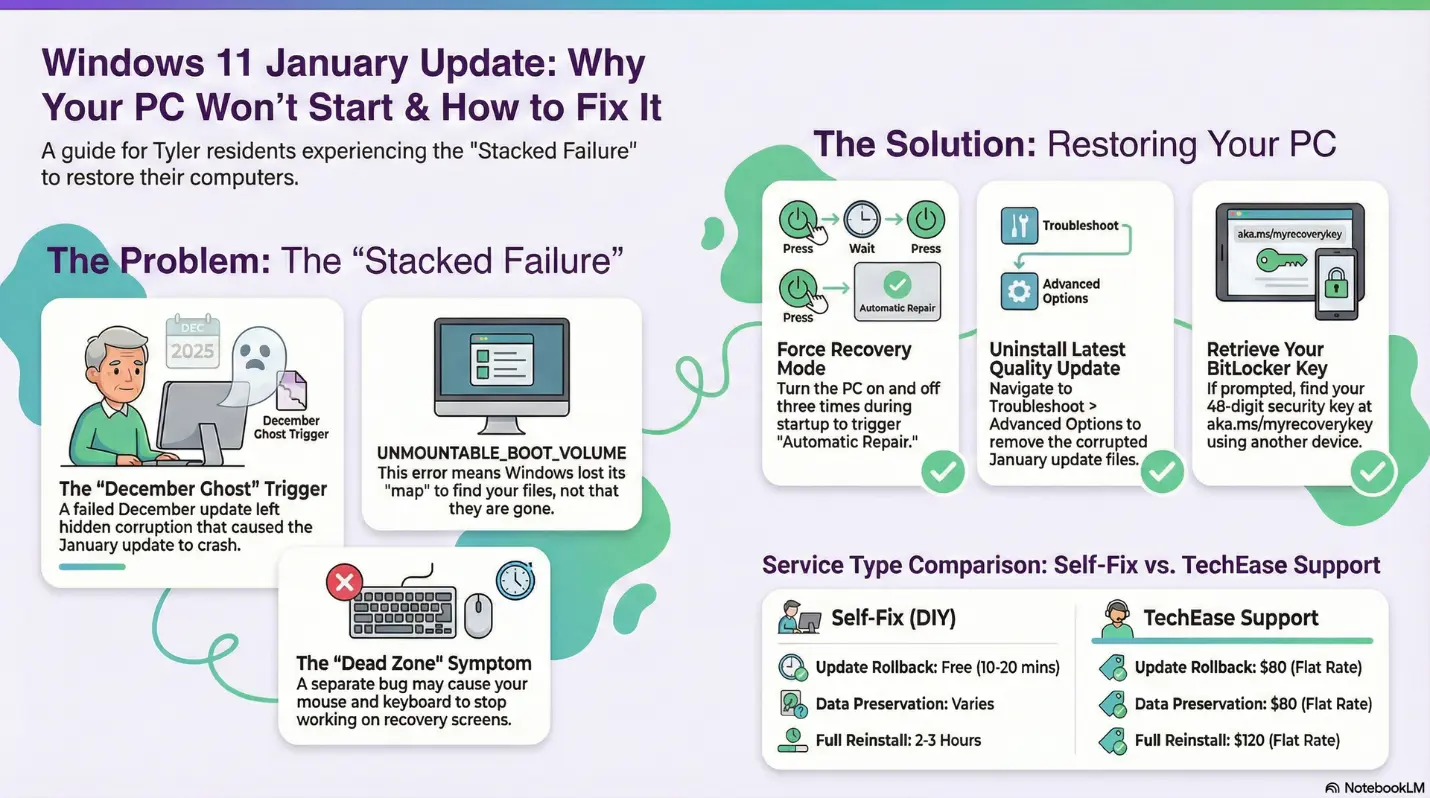
In December 2025, Windows tried to install a security update on millions of computers. On many of them, the update failed. That’s not unusual. What is unusual is what happened next. When Windows detected the failure, it automatically tried to “roll back” and return your computer to its previous state. On the surface, this appeared to work. Your computer started up normally. All was good.
But underneath, in the hidden system files that Windows uses to manage updates, something was broken. Think of it like a house foundation with a hairline crack: the house is still standing, the lights still work, but the foundation is compromised.
The January Trigger That Cracked the Foundation
On January 13, 2026, Microsoft released the January security update (KB5074109). For computers with that hidden December corruption, this update became a trigger that brought the whole system down. The update tried to make changes to critical system files, but because your computer’s internal map was corrupted from December, the changes were installed incorrectly. When you restarted, Windows couldn’t read those files. It was like trying to open a door when someone had changed the locks but didn’t give you the new key.
🤔 Why Rolling Back Made Things Worse
When your computer wouldn’t start, you tried the logical first step: rolling back the January update. But when you tried to uninstall it, Windows was attempting to reverse those changes based on the same corrupted map that caused the problem in the first place.
Microsoft’s engineers call this a “stacked failure”: one problem creates conditions for a second problem, and then the attempted fix makes both problems worse. This is why some people found their computer wouldn’t even try to start after a rollback attempt.
💻 What You’re Seeing On Your Screen
Your computer powers on, you see the Windows loading animation, then suddenly an error screen: “Your PC ran into a problem and needs to restart.” You might see “UNMOUNTABLE_BOOT_VOLUME” or “0xED” at the bottom. Your hardware is fine. The problem is entirely with Windows being unable to access your hard drive.
A blue screen asking for a 48-digit “BitLocker Recovery Key.” BitLocker detected something wrong and locked your hard drive as a safety measure. Your recovery key exists and is stored in your Microsoft account online. We’ll show you how to find it.
Your computer boots to a blue “recovery” screen with buttons like “Continue” and “Troubleshoot,” but your mouse and keyboard don’t respond. A separate October 2025 bug broke USB drivers in the recovery environment. You can see the tools that would fix your computer, but you can’t reach them. We have a workaround.
🔧 Step-by-Step Solutions: Getting Your Computer Back
Solution #1: The Standard Rollback
This works if: You can get into Recovery Mode and your keyboard/mouse work. If you’re in the “Dead Zone,” skip to Solution #2.
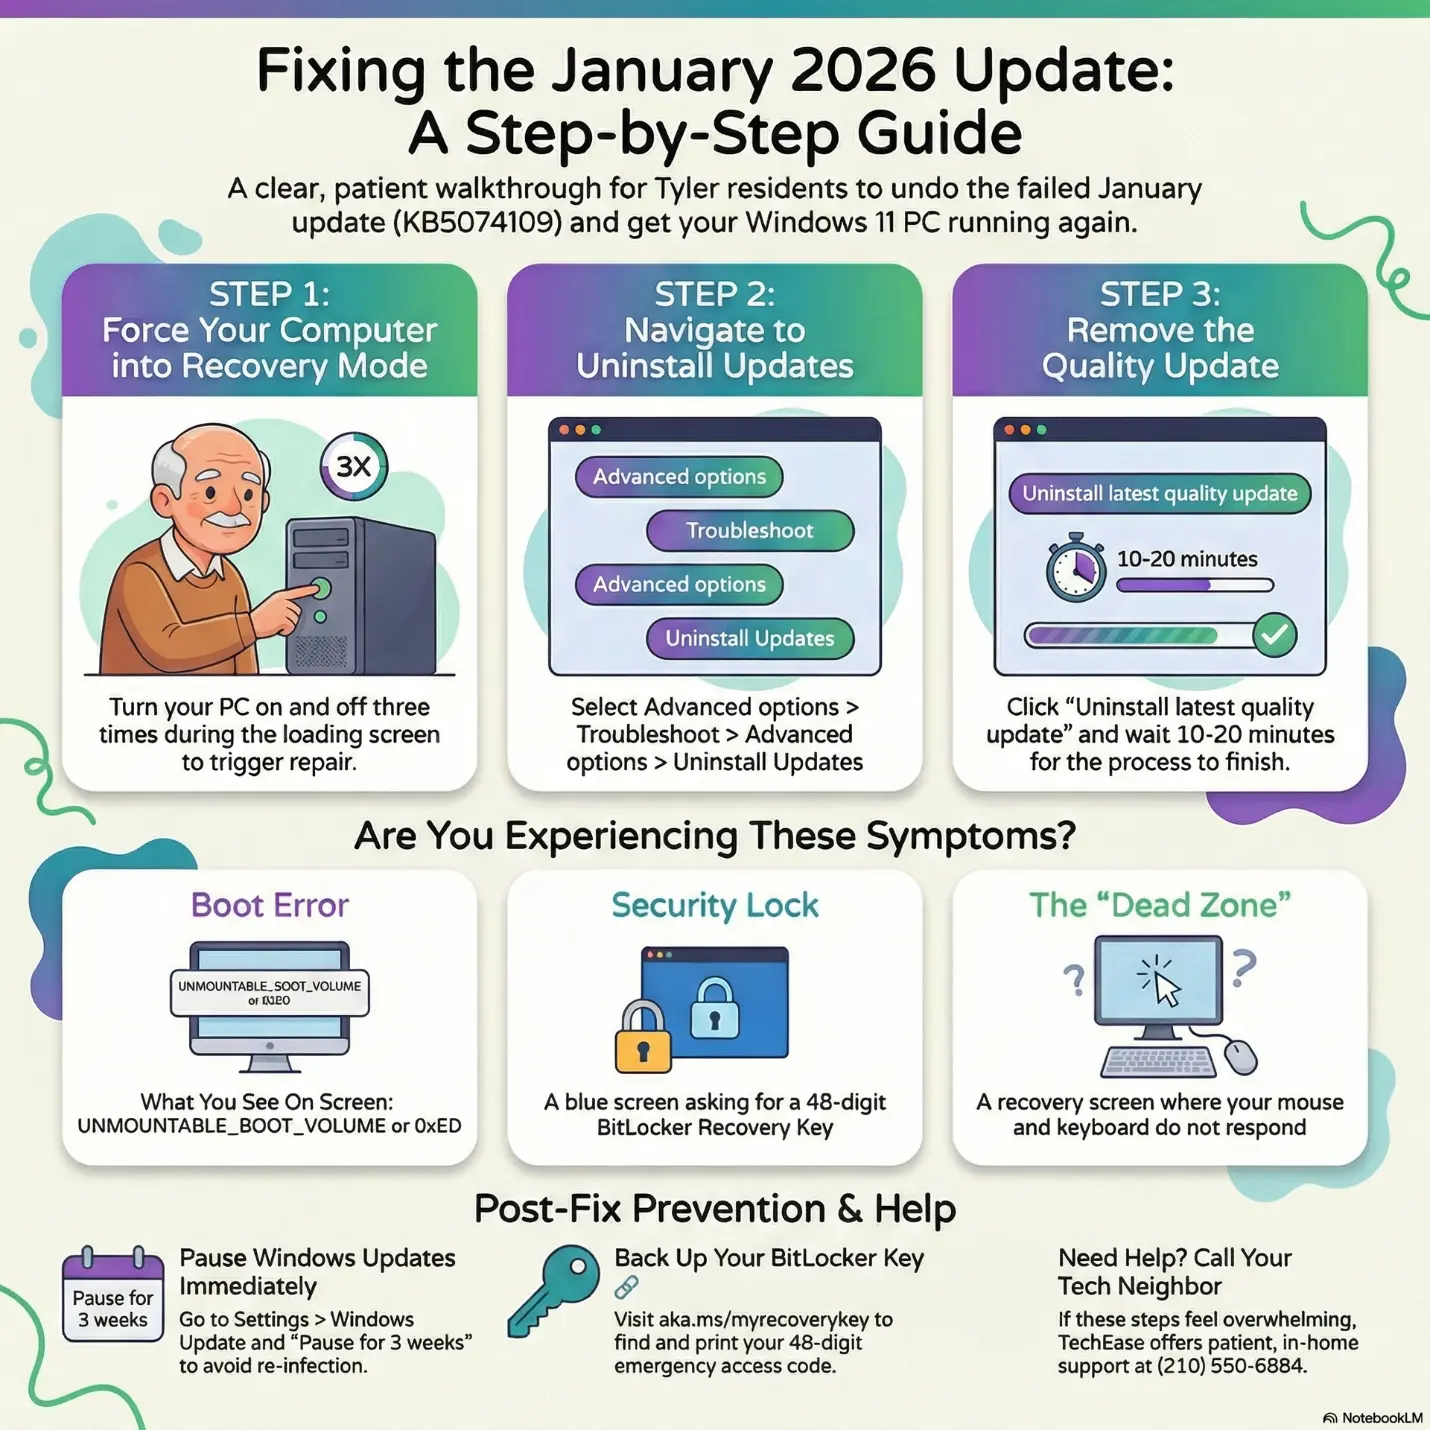
Turn on your computer. As soon as you see the Windows spinner, hold the power button until it shuts off. Repeat 3 times total. On the 4th startup you should see “Preparing Automatic Repair.”
Click “Advanced options” then “Troubleshoot” then “Advanced options” again then “Uninstall Updates.”
Click “Uninstall latest quality update.” DO NOT click “Uninstall latest feature update.” Wait 10-20 minutes. Do not turn off your computer.
Solution #2: Getting Around the “Dead Zone”
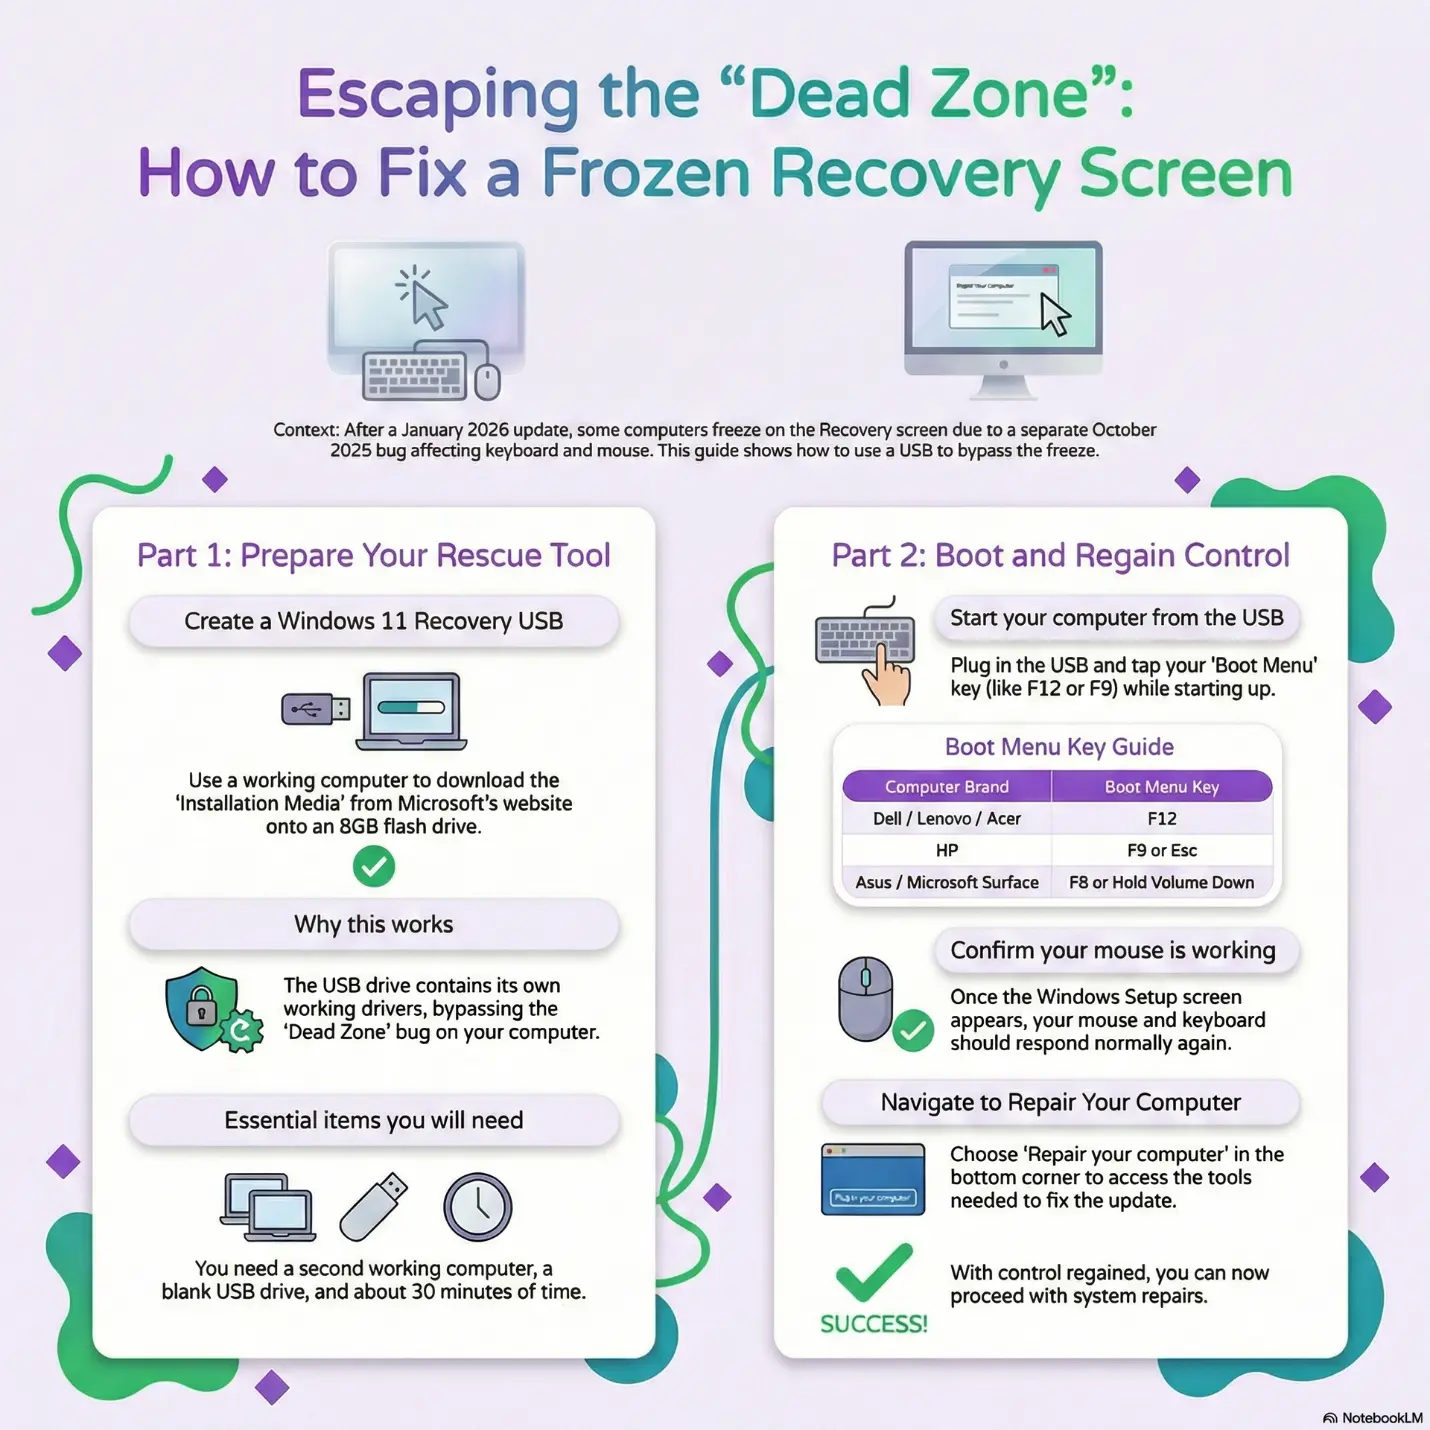
You’ll need: a working computer (maybe a family member’s laptop), a USB flash drive with at least 8GB, and about 30 minutes.
Part A: Create the Windows 11 Recovery USB (on a working computer)
Go to microsoft.com/software-download/windows11. Scroll to “Create Windows 11 Installation Media” and download the tool. Run it, select “Create installation media for another PC,” then “USB flash drive.” The download takes 20-30 minutes.
Part B: Boot from the USB and access Recovery Tools
Insert the USB into your problem computer. Turn it on and tap the Boot Menu key repeatedly: Dell = F12, HP = F9 or Esc, Lenovo = F12 or F10, Asus = F8, Acer = F12, Surface = hold Volume Down while pressing Power. Select your USB drive. When the Windows setup screen appears, your keyboard and mouse should work. Click “Repair your computer” in the bottom-left corner.
Solution #3: Unlocking BitLocker
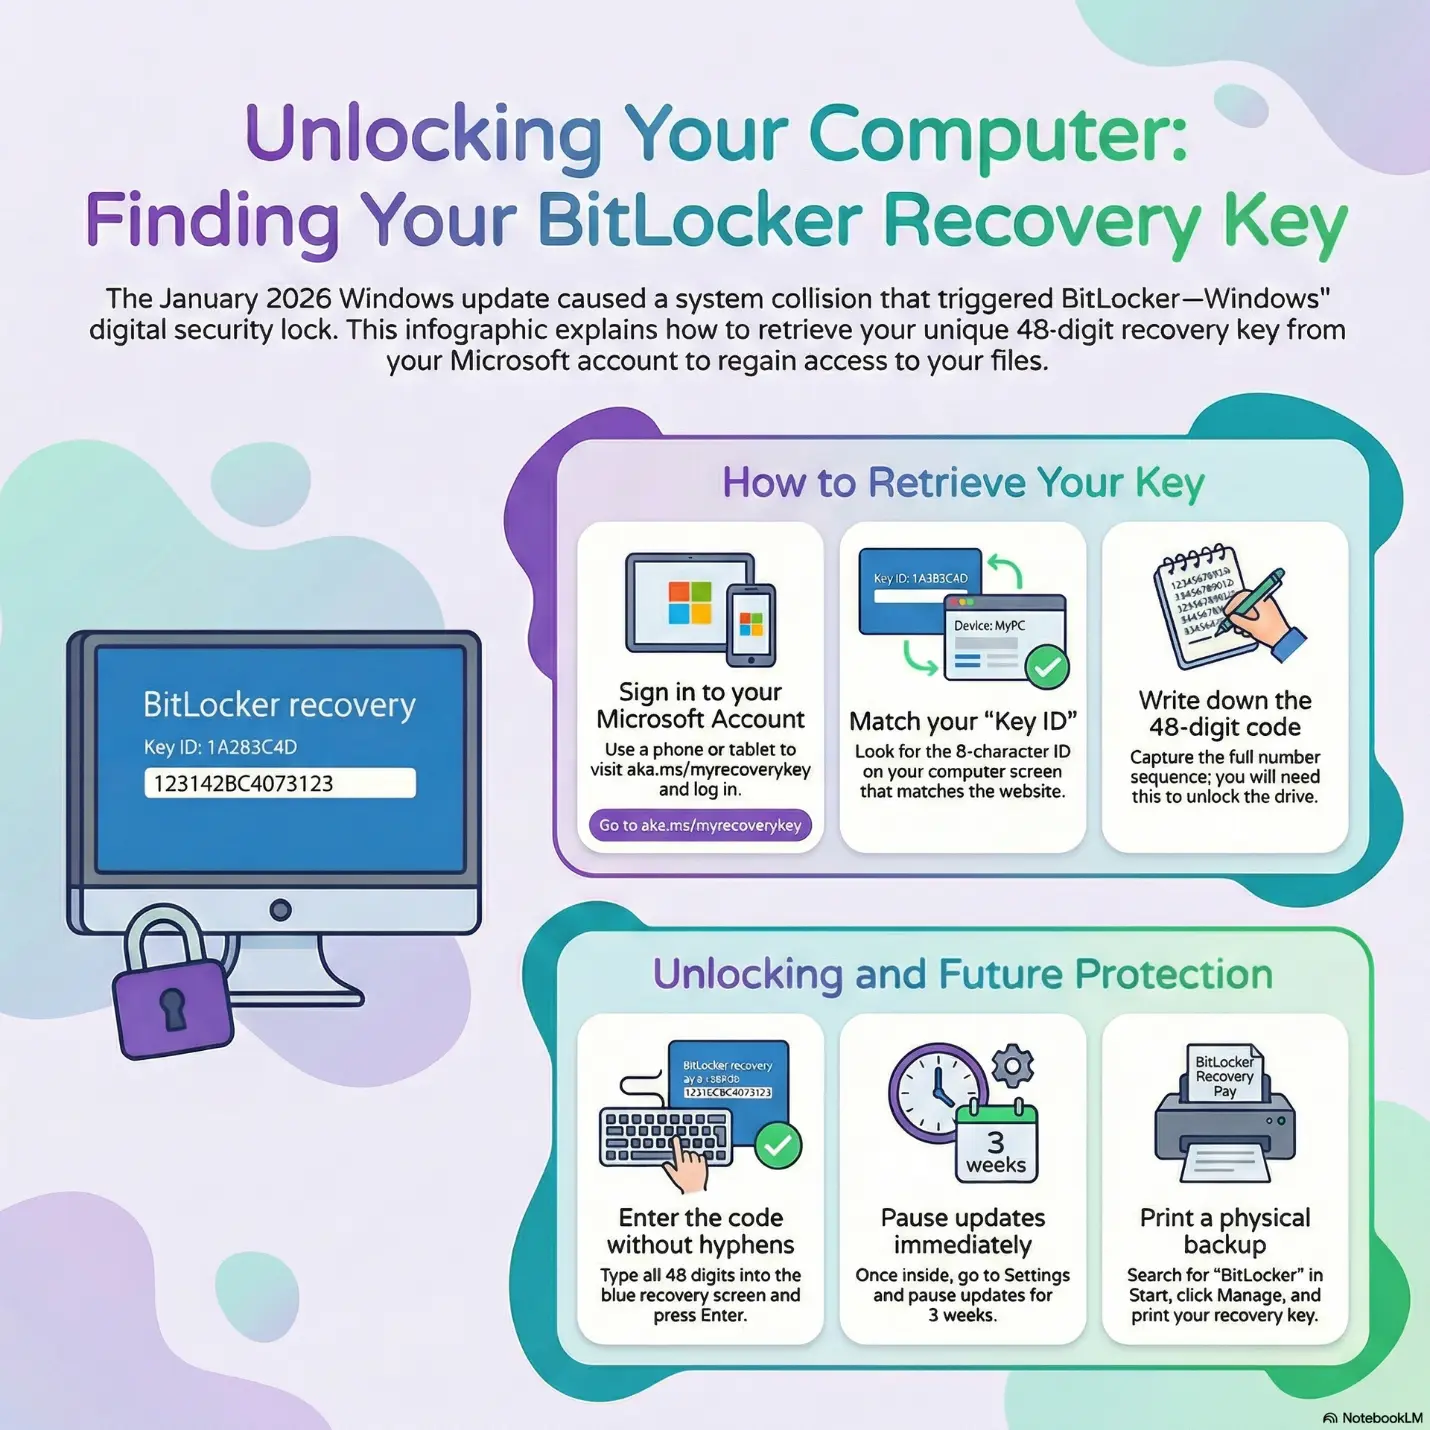
On a different device (phone, tablet, or someone else’s computer), go to aka.ms/myrecoverykey and sign in with your Microsoft account. Match the “Key ID” shown on your broken computer’s blue screen to the device listed on the website. Write down the 48-digit recovery key and type it into your computer. You don’t need to type the hyphens.
Solution #4: Advanced Repair Using Command Line
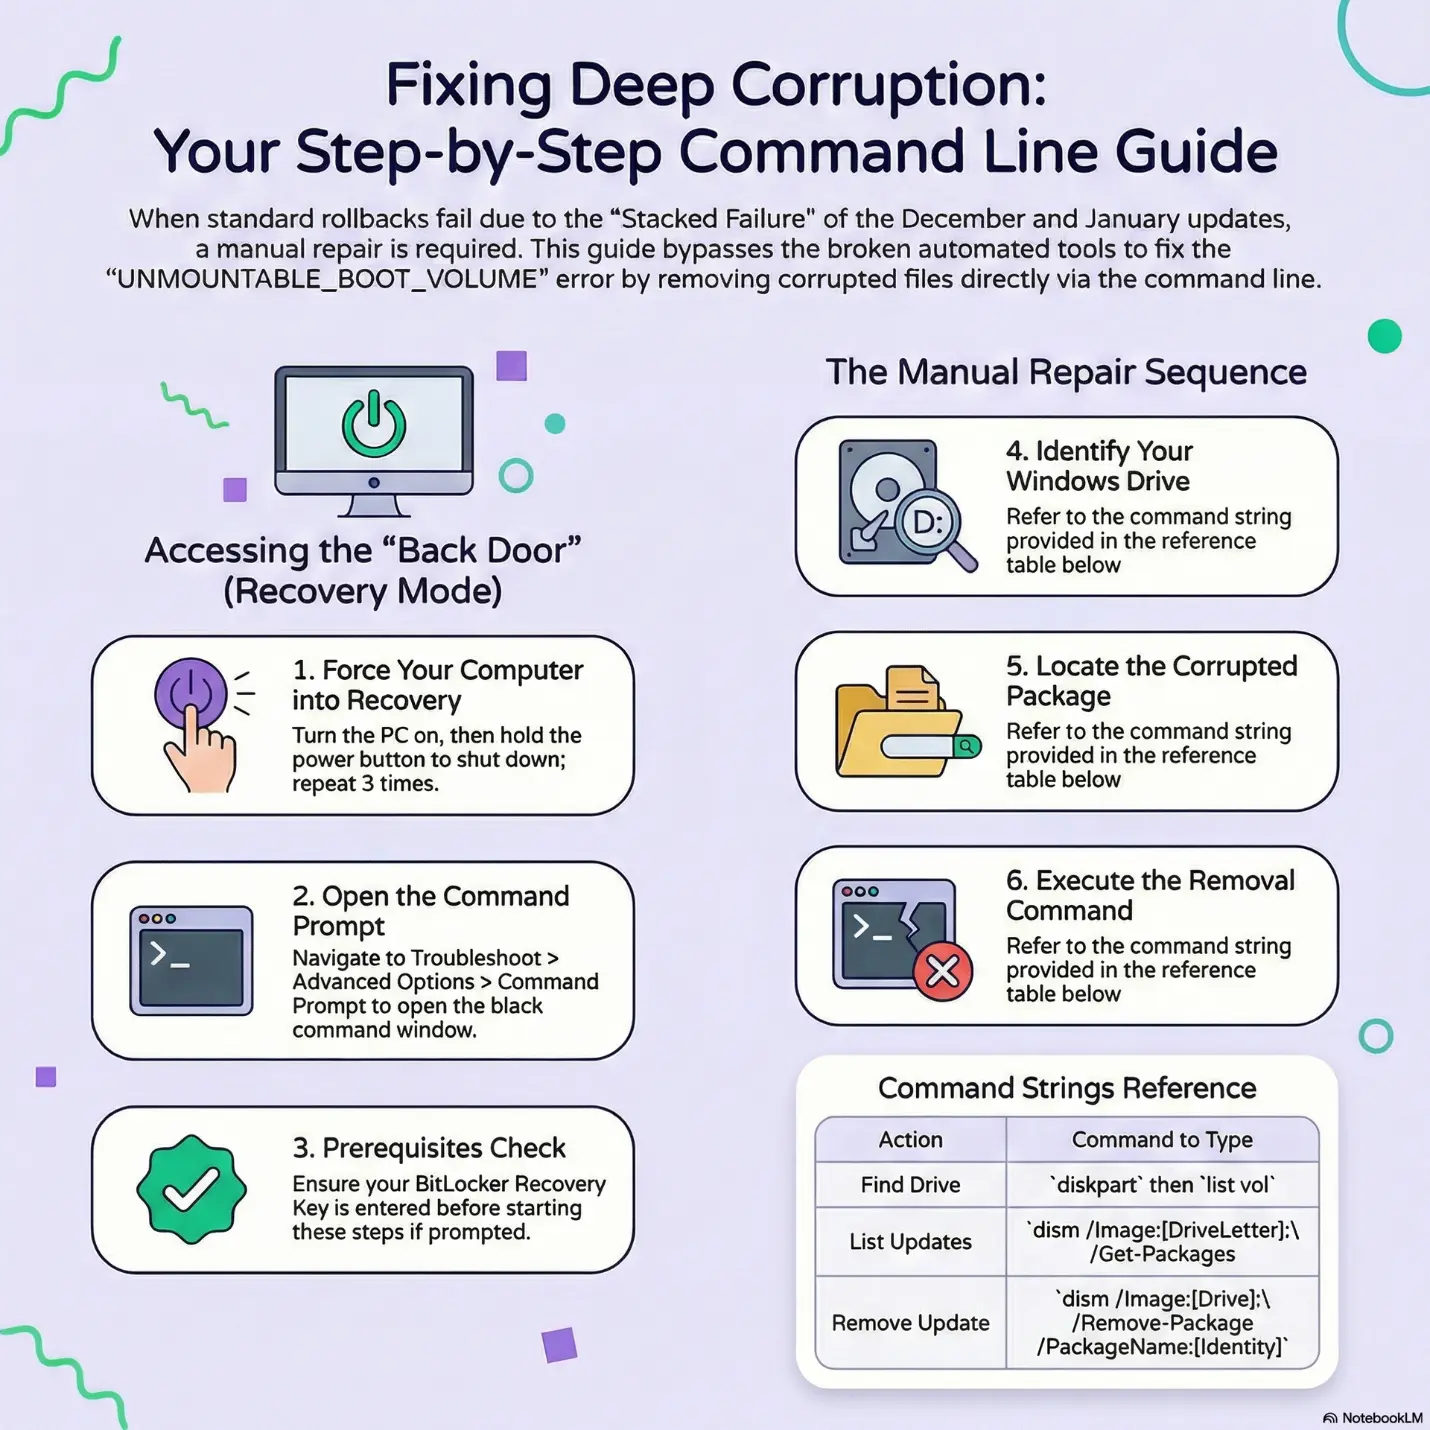
If Solutions 1-3 didn’t work, we need to manually remove the corrupted update files using the command line. If this feels overwhelming, this is a great time to give us a call. We can do this for you remotely or in person.
From Recovery Mode, go to Troubleshoot, Advanced Options, Command Prompt. Type diskpart and press Enter, then list vol to find your Windows drive letter. Type exit. Then run: dism /Image:D:\ /Get-Packages (replace D with your drive letter). Find the entry dated around January 13-14, 2026 with “SecurityUpdate” in the name. Copy the full Package Identity line, then run: dism /Image:D:\ /Remove-Package /PackageName:[PASTE IDENTITY HERE]. Wait for “The operation completed successfully,” then restart.
🛡️ Preventing This From Happening Again
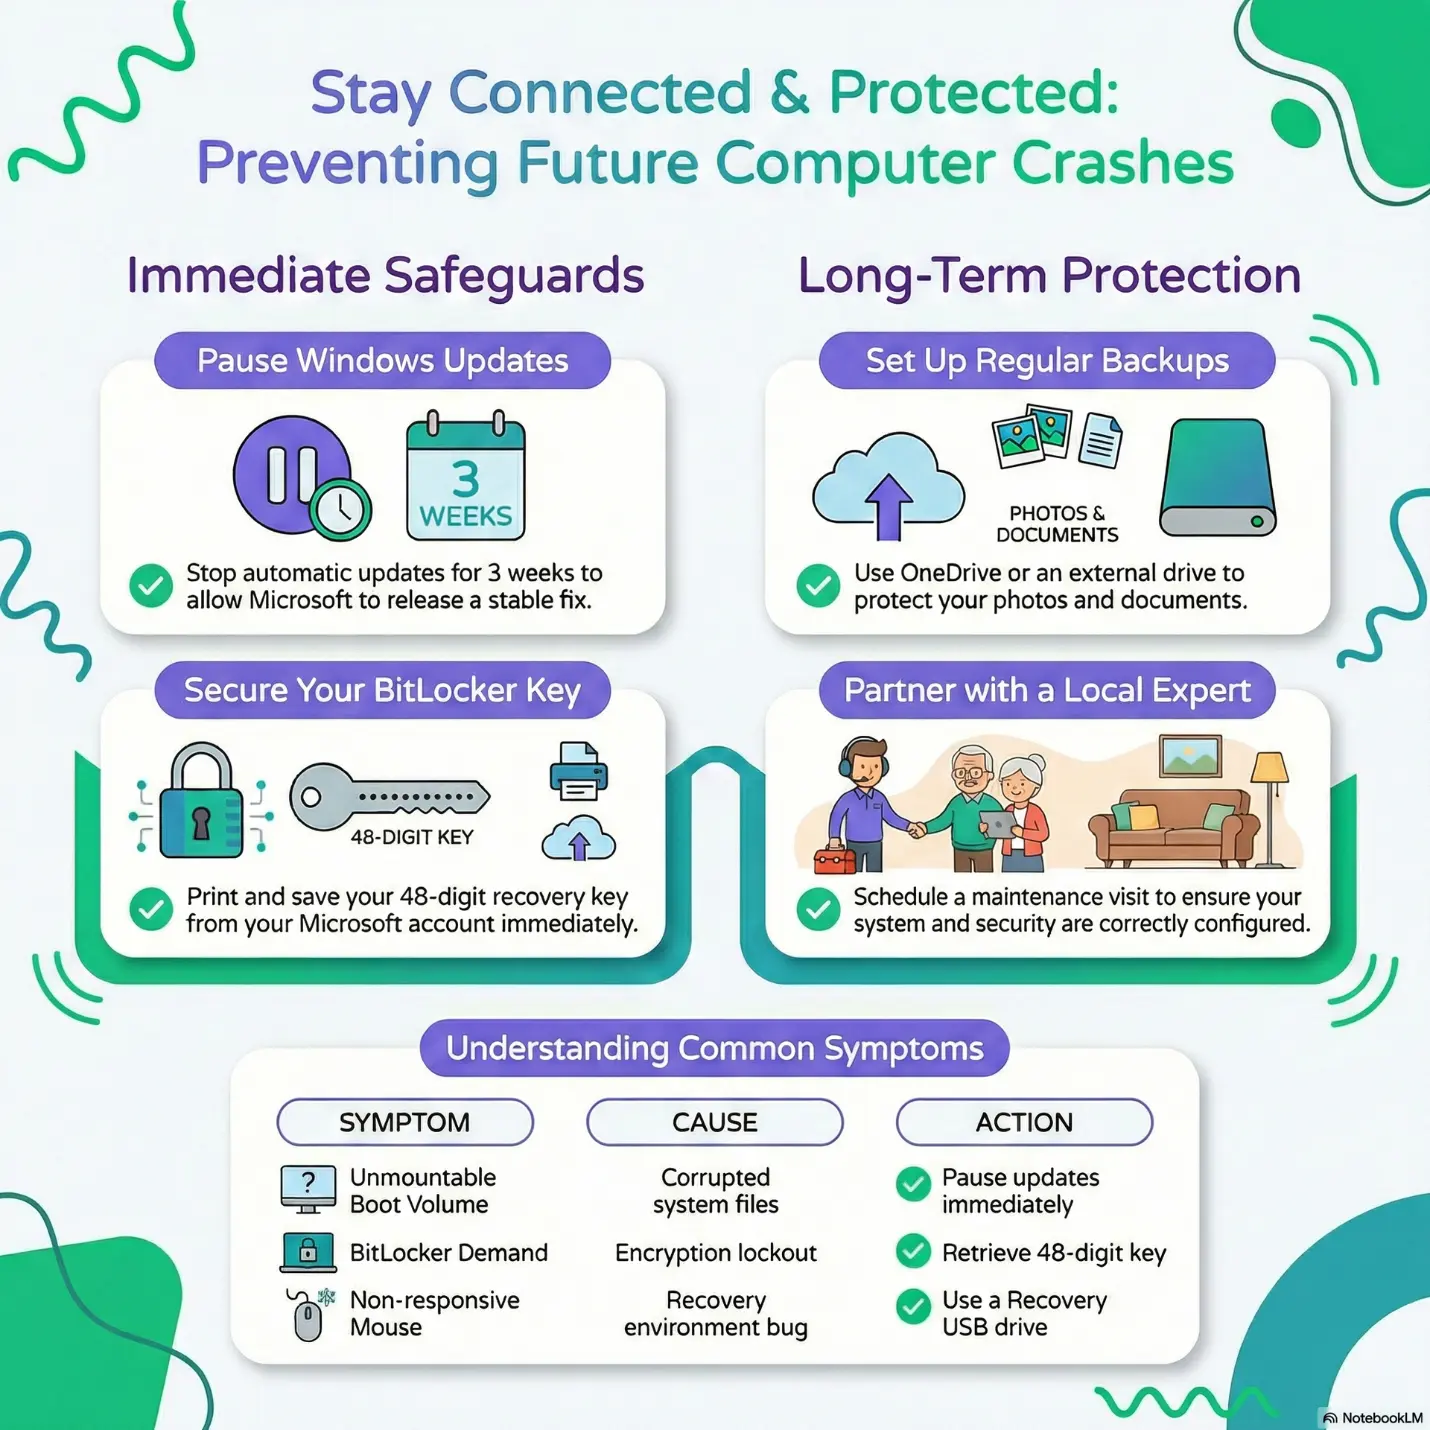
Go to Settings, Windows Update and click “Pause updates” for 3 weeks. This gives Microsoft time to release a fixed version before your computer downloads it again.
Open Start, type “BitLocker,” click “Manage BitLocker,” find your C: drive, click “Back up your recovery key,” and choose “Print the recovery key.” Store it with your important documents.
OneDrive can automatically sync your Documents, Pictures, and Desktop to the cloud. An external hard drive once a month also works great. At TechEase, we can set up automated backups so you never have to remember.
Stay safe, Tyler.
Robert
Owner, TechEase
“No jargon, no judgment, just patient help that makes sense.”
📞 (210) 550-6884 | [email protected] | techeasetyler.com
Published: February 2026